操作
InstallRailsMac » 履歴 » リビジョン 87
« 前 |
リビジョン 87/102
(差分)
| 次 »
Yuumi Yoshida, 2016-05-06 14:08
Ruby on Rails 開発環境の作り方(Mac OS X 10.11)
2016/05/06更新
1 . Command Line Toolsのインストール
ターミナルで以下を実行
$ xcode-select --install
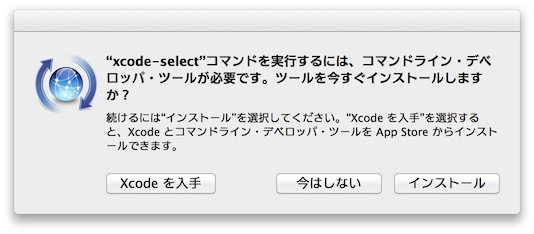
以下のようなダイアログが表示されるので「インストール」をクリックするとダウンロード・インストールが開始します

ダイアログが表示されずに、ターミナルに以下の様に表示された場合は Command Line Tools は既にインストールされています。
xcode-select: error: command line tools are already installed, use "Software Update" to install updates
2. homebrew(Unix系ツール)のインストール
Hombrew ホームページ http://brew.sh/
ターミナルで以下を実行 ( 長い行もあるのでコイピペの際は注意 )
$ /usr/bin/ruby -e "$(curl -fsSL https://raw.githubusercontent.com/Homebrew/install/master/install)"

...

Press ENTER to continue or any other key to abort       # ← enter(return)キーを押す

...

To proceed, enter your password, or type Ctrl-C to abort.

Password:                    # ← ログインのパスワードを入力

$ brew doctor

Your system is ready to brew.
3. rbenv, Rubyのインストール
複数のバージョンのRubyを切り換えて使えるコマンドです https://github.com/sstephenson/rbenv/
ターミナルで以下を実行
- rbenv のインストール
$ brew update
$ brew install ruby-build
$ brew install rbenv
$ rbenv install -l
Available versions:
  1.8.6-p383

  ...

   2.3.1     ←表示に2.3.1があることを確認する。

   ...
- Rubyのインストール
$ rbenv install 2.3.1
$ rbenv rehash
$ rbenv global 2.3.1
- .bash_profile を編集、以下を追加
export PATH="$HOME/.rbenv/bin:$PATH"
eval "$(rbenv init -)"
- Rubyの確認、ターミナルで以下を実行
$ source .bash_profile
$ ruby -v
ruby 2.3.0 .... # ← 確認
4 .Railsのインストール
ターミナルで以下を実行
- gemコマンドのアップデート
$ gem update --system -N
Latest version currently installed. Aborting. と表示された場合は、最新版がインストールされているので問題ありません。
- インストール
$ gem install bundler -N
$ gem install rspec -N
$ gem install rails  -N
$ rbenv rehash
※ gemインスト−ルの後の rbenv rehash を忘れずに
- 確認
$  rails -v
Rails 4.2.6   # ← 確認
5. 関連ライブラリーのインストール
Ruby on Railsでは初めてプロジェクトを作った際に関連するライブラリーがインストールされるので、一度ダミーのプロジェクトを作成します。
$ cd /tmp
$ rails new dummy
      create
      create  README.rdoc
      create  Rakefile

      ...

Your bundle is complete!
Use `bundle show [gemname]` to see where a bundled gem is installed.
ダミーのプロジェクトは削除してかまいません。
Yuumi Yoshida さんが9年以上前に更新 · 87件の履歴